This website uses cookie or similar technologies, to enhance your browsing experience and provide personalised recommendations. By continuing to use our website, you agree to our privacy policy. You can adjust cookie preferences in Cookie Settings.


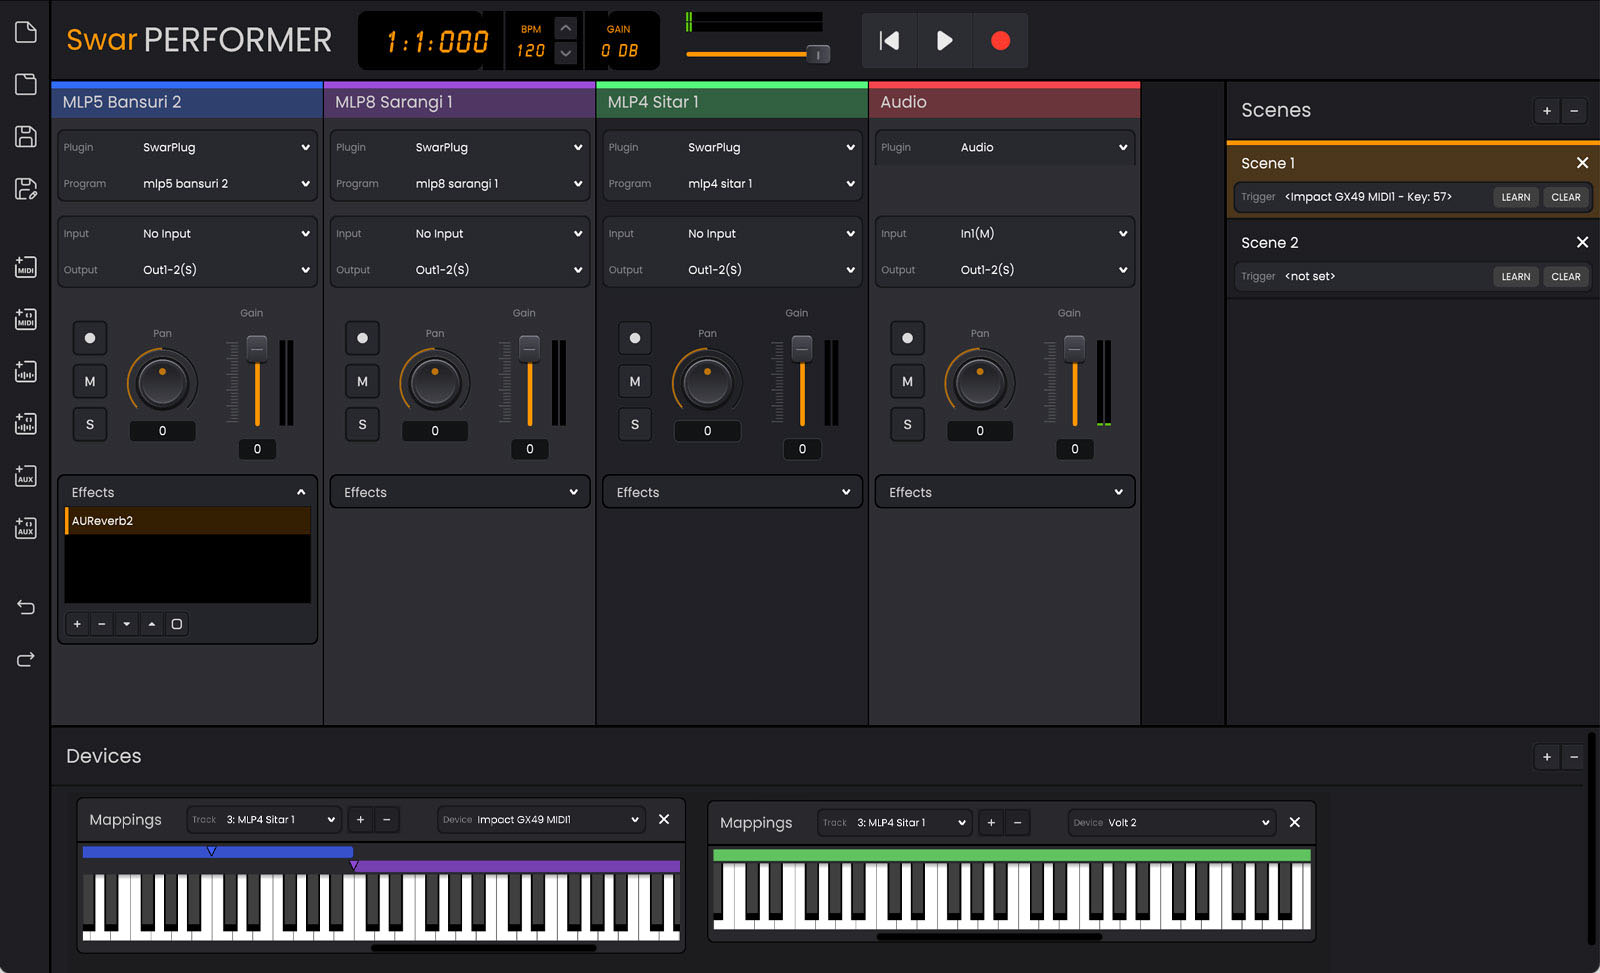
Swar Performer comes with a couple example sessions. You can load one and/or the other to get an idea of the way it can be configured. The example-separate-scenes session maps each scene to a separate track. So just changing the scene switches instrument on the device.
The example-split-keyboard has a first scene that maps different key ranges on the keyboard to trigger 2 separate tracks. The second scene triggers the last track.
Check these sessions, try to play them from the virtual keyboard or from a physical one, after you select it in the Device dropdown.
Now that you have a better idea of the app configurations, you can proceed to create a new session. Swar Performer usually opens with one, but if you have made any changes and would like to start from a clean sheet, you can click on the New Session icon on the toolbar (first icon). You may also select the File > New Session option on the menu.
Swar Performer automatically adds a MIDI track with SwarPlug (if present), a scene and a virtual device with a mapping so that you can directly select a voice on the track and start playing from the virtual keyboard. But you can of course rearrange that to your own requirements.
You can start by the tracks. Add any additional tracks you need and load a virtual instrument and voice in each. By default SwarPlug is preloaded, but you can click on the down arrow of the plugin dropdown and select a different virtual instrument there. Once the plugin is selected, you can click on the arrow of the program dropdown to select a voice. If no entry is provided there (plugin doesn't export a set of programs), you can click on the plugin name and this will open the plugin editor, where you can make any specific changes. These changes will be saved along with your session.
Next you can configure the Devices pane. If you have more than one MIDI controller, you can add additional devices by pressing on the + button. Then you can select the correct hardware on the Device dropdown for each component. Try playing the keys from your physical device and check that they show on the virtual one.
Now, since you should have the first scene selected, you can proceed with creating your first mappings. For that, select the track you want to target in the dropdown, and then press the "+" button of the Mappings bar. This will add a long rounded rectangle of the colour of your track that should cover most of the keys in the virtual device. You can then resize it so it only covers the specific key range you want.
Do this same process for as many tracks as you want, adjusting the mappings to separate ranges if you want distinct voices and/or overlapping if you want the same keys to play multiple voices at the same time.
You'll see that the mapping rectangle always carries an arrow at its first key. This is for transposing your notes if needed. Indeed, if you want to map multiple voices on a single keyboard, you may have to play some keys on the low range, but want the output to be on the normal range/higher pitch. This can easily be achieved by dragging the arrow alone to the required number of octaves to the right.
Similarly, if you are playing higher keys on your keyboard and want the output to be on a lower pitch, you can drag the arrow a few octaves to the left.
All the mappings you created are bound to the currently selected scene. So if you want to be able to remap your keyboard to other tracks, you can simply create another scene (by pressing the Scenes "+" button), select it and add new mappings there.
Once that is done, you'll see that clicking on the different scenes show the different mappings and playback also triggers the tracks differently.
Now, when playing you may not want to reach out to your mouse to click a different scene. This is where the scene triggering key is very useful. Click on the LEARN button of a scene, then press a specific key or button on your keyboard; you'll see that key is stored as trigger for the scene. From then on, whenever you'll press that key/button, that scene will be activated, so you can switch instruments on the fly.
This is about all you need to know for this first basic session. Remember to save it and give it an explicit name so you can retrieve it easily next time.