This website uses cookie or similar technologies, to enhance your browsing experience and provide personalised recommendations. By continuing to use our website, you agree to our privacy policy. You can adjust cookie preferences in Cookie Settings.


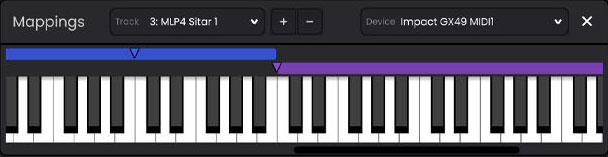
Here is where you'll make the connection between MIDI controllers and the synths in the tracks. This is done through what we call "Mappings".
This lets you select the track for which you'll be adding a mapping. You can also click on the corresponding track in the Tracks panel, and the drop-down will be automatically updated.
By default, this field will be set to
You'll see here any mappings defined in the scene. They will appear as rounded rectangles that stretch across a certain number of keys. When those keys are played on the device, the events will be sent to the corresponding track(s).
You can resize/move each mapping to cover exactly the keys you want.
The arrow at the begining of the mapping can also be moved. This transposes your keys by a negative (arrow to the left) or positive (arrow to the right) offset. This allows you to play lower keys on your keyboard, but still trigger higher sounds on the synth.
To remove a mapping, just click on it and press Delete key or the "-" button on top of the device.
At the bottom, you'll find a fully functioning virtual MIDI keyboard. You can play the keys there with the mouse directly. Also if a physical keyboard is connected, you should see the keys played highlighted accordingly.